
The included fonts are derived from the GNU FreeFont project. There are three faces: “Serif” (reminiscent of Times New Roman), “Sans” (reminiscent of Helvetica or Arial) and “Mono” (reminiscent of Courier). Each is available in a few styles (bold, italic, etc.) and sizes. The included fonts are in a bitmap format, not scalable vectors, as it needs to work within the limitations of a small microcontroller.
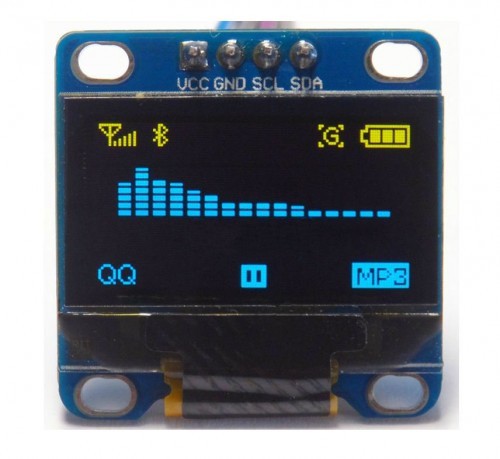
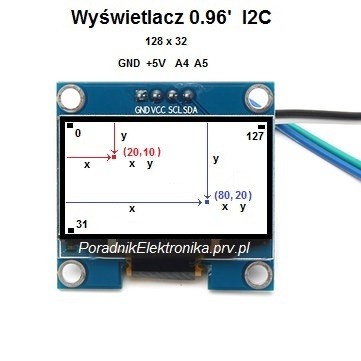
Wyświetlacz OLED 0.96'
Korzystając z biblioteki Adafruit SSD1306 możemy w prosty sposób wyświetlać nasze dane.
W tym modelu mamy do dyspozycji 2 obszary graficzne, poniżej "bear minimum" do obsługi.
Należy pamiętać kilka komend:
* print wyświetla znaki nie dodając dodatkowych spacji aż do końca wiersza...
* println wyświetla znaki dodając spacje aż do ostatniego wiersza...
* display.display musi być zawsze na końcu !!! by wyświetlić dane na wyświetlaczu.
* display.setTextSize(1); rozmiar czcionki nr 1
* display.setTextColor(WHITE); kolor niebieski lub żółty w górnym obszarze
* display.setCursor(0,0); ustal kursor w miejscu 0.0
x1 y1 x2 y2
* display.drawLine(20, 10, 80, 20, WHITE);
należy pamiętać by zainstalować 2 biblioteki Adafruit_GFX i Adafruit_SSD1306
#include <wire.h>
#include <Adafruit_GFX.h>
#include <Adafruit_SSD1306.h>
#define OLED_RESET 5
Adafruit_SSD1306 display(OLED_RESET);
void setup()
{
Serial.begin(9600);
display.begin(SSD1306_SWITCHCAPVCC, 0x3C);
// inicjalizacja wyświetlacza, należy wpisać adres wyświetlacza sprawdzejąc go programem scaner i2c
display.display();
delay(1);
display.clearDisplay();
display.drawPixel(10, 10, WHITE); // rysuj pojedyńczy pixel
display.setTextSize(1);// test wyświetlacza (text)
display.setTextColor(WHITE);
display.setCursor(0,0);
display.println("Hello, world!");
display.setTextColor(WHITE, BLACK); // 'inverted' text
display.println("3.141592");
display.setTextSize(2);
display.setTextColor(WHITE);
display.print("0x"); display.println(0xDEADBEEF, HEX);
display.display();
delay(2000);
}
void loop()
{
display.setTextSize(1);
display.setTextColor(WHITE);
display.setCursor(0,0);
display.setTextColor(WHITE, BLACK); // 'inverted' text
display.println("3.9992");
display.setTextSize(2);
display.setTextColor(WHITE);
display.print("0x"); display.println(0xDEADB, HEX);
display.display();
}
//END loop
Ustawienia softu i problemy
Jeśli posiadasz wyświetlacz 128 x 64 należy odnaleść plik Adafruit_SSD1306.h i zmienić w nim typ z 32 na 62 przenosząc // w góre
*=========================================================================
SSD1306 Displays
-----------------------------------------------------------------------
The driver is used in multiple displays (128x64, 128x32, etc.).
Select the appropriate display below to create an appropriately
sized framebuffer, etc.
SSD1306_128_64 128x64 pixel display
SSD1306_128_32 128x32 pixel display
SSD1306_96_16
-----------------------------------------------------------------------*/
#define SSD1306_128_64
// #define SSD1306_128_32
// #define SSD1306_96_16
/*=========================================================================*/
plik ten znajduje się w katalogu bibliotek importowanych.... w arduino IDE plik / preferencje / lokalizacja szkicownika tam szukamy folderu libraries / adafruit_SSD1306 / plik .h jest w głownym katalogu biblioteki. do otwarcia polecam WordPad
Czcionki
I second that It is not that clear and spend an hour to see if I'm missing something.
For the future readers to change the font do the following:
1- Include the font header that you wish to use
#include <Fonts/FreeSans9pt7b.h>
2-Set the font
//Assuming you have declared your display object for instance:
//Adafruit_SSD1306 display(OLED_RESET);
display.setFont(&FreeSans9pt7b);
That's it.
Using Fonts
More recent versions of the Adafruit GFX library offer the ability to use alternate fonts besides the one standard fixed-size and -spaced face that’s built in. Several alternate fonts are included, plus there’s the ability to add new ones.
|
|
|
Located inside the “Fonts” folder inside Adafruit_GFX, the included files (as of this writing) are:
- FreeMono12pt7b.h FreeSansBoldOblique12pt7b.h
- FreeMono18pt7b.h FreeSansBoldOblique18pt7b.h
- FreeMono24pt7b.h FreeSansBoldOblique24pt7b.h
- FreeMono9pt7b.h FreeSansBoldOblique9pt7b.h
- FreeMonoBold12pt7b.h FreeSansOblique12pt7b.h
- FreeMonoBold18pt7b.h FreeSansOblique18pt7b.h
- FreeMonoBold24pt7b.h FreeSansOblique24pt7b.h
- FreeMonoBold9pt7b.h FreeSansOblique9pt7b.h
- FreeMonoBoldOblique12pt7b.h FreeSerif12pt7b.h
- FreeMonoBoldOblique18pt7b.h FreeSerif18pt7b.h
- FreeMonoBoldOblique24pt7b.h FreeSerif24pt7b.h
- FreeMonoBoldOblique9pt7b.h FreeSerif9pt7b.h
- FreeMonoOblique12pt7b.h FreeSerifBold12pt7b.h
- FreeMonoOblique18pt7b.h FreeSerifBold18pt7b.h
- FreeMonoOblique24pt7b.h FreeSerifBold24pt7b.h
- FreeMonoOblique9pt7b.h FreeSerifBold9pt7b.h
- FreeSans12pt7b.h FreeSerifBoldItalic12pt7b.h
- FreeSans18pt7b.h FreeSerifBoldItalic18pt7b.h
- FreeSans24pt7b.h FreeSerifBoldItalic24pt7b.h
- FreeSans9pt7b.h FreeSerifBoldItalic9pt7b.h
- FreeSansBold12pt7b.h FreeSerifItalic12pt7b.h
- FreeSansBold18pt7b.h FreeSerifItalic18pt7b.h
- FreeSansBold24pt7b.h FreeSerifItalic24pt7b.h
- FreeSansBold9pt7b.h FreeSerifItalic9pt7b.h
Each filename starts with the face name (“FreeMono”, “FreeSerif”, etc.) followed by the style (“Bold”, “Oblique”, none, etc.), font size in points (currently 9, 12, 18 and 24 point sizes are provided) and “7b” to indicate that these contain 7-bit characters (ASCII codes “ ” through “~”); 8-bit fonts (supporting symbols and/or international characters) are not yet provided but may come later.
Using GFX Fonts in Arduino Sketches
After #including the Adafruit_GFX and display-specific libraries, include the font file(s) you plan to use in your sketch. For example:
- #include<Adafruit_GFX.h>// Core graphics library
- #include<Adafruit_TFTLCD.h>// Hardware-specific library
- #include<Fonts/FreeMonoBoldOblique12pt7b.h>
- #include<Fonts/FreeSerif9pt7b.h>
Each font takes up a bit of program space; larger fonts typically require more room. This is a finite resource (about 32K max on an Arduino Uno for font data and all of your sketch code), so choose carefully. Too big and the code will refuse to compile (or in some edge cases, may compile but then won’t upload to the board). If this happens, use fewer or smaller fonts, or use the standard built-in font.
Inside these .h files are several data structures, including one main font structure which will usually have the same name as the font file (minus the .h). To select a font for subsequent graphics operations, use the setFont() function, passing the address of this structure, such as:
- tft.setFont(&FreeMonoBoldOblique12pt7b);
Subsequent calls to tft.print() will now use this font. Most other attributes that previously worked with the built-in font (color, size, etc.) work similarly here.
To return to the standard fixed-size font, call setFont(), passing either NULL or no arguments:
- tft.setFont();
Some text attributes behave a little differently with these new fonts. Not wanting to break compatibility with existing code, the “classic” font continues to behave as before.
For example, whereas the cursor position when printing with the classic font identified the top-left corner of the character cell, with new fonts the cursor position indicates the baseline — the bottom-most row — of subsequent text. Characters may vary in size and width, and don’t necessarily begin at the exact cursor column (as in below, this character starts one pixel left of the cursor, but others may be on or to the right of it).
When switching between built-in and custom fonts, the library will automatically shift the cursor position up or down 6 pixels as needed to continue along the same baseline.

One “gotcha” to be aware of with new fonts: there is no “background” color option…you can set this value but it will be ignored. This is on purpose and by design.
The background color feature has typically been used with the “classic” font to overwrite old screen contents with new data. This only works because those characters are a uniform size; it’s not a sensible thing to do with proportionally-spaced fonts with characters of varying sizes (and which may overlap).
To replace previously-drawn test when using a custom font, use the getTextBounds() function to determine the smallest rectangle encompassing a string, erase the area using fillRect(), then draw new text.
- int16_t x1, y1;
- uint16_t w, h;
- tft.getTextBounds(string, x, y,&x1,&y1,&w,&h);
getTextBounds expects a string, a starting cursor X&Y position (the current cursor position will not be altered), and addresses of two signed and two unsigned 16-bit integers. These last four values will then contain the upper-left corner and the width & height of the area covered by this text — these can then be passed directly as arguments to fillRect().
This will unfortunately “blink” the text when erasing and redrawing, but is unavoidable. The old scheme of drawing background pixels in the same pass only creates a new set of problems.
Adding New Fonts
If you want to create new font sizes not included with the library, or adapt entirely new fonts, we have a command-line tool (in the “fontconvert” folder) for this. It should work on many Linux- or UNIX-like systems (Raspberry Pi, Mac OS X, maybe Cygwin for Windows, among others).
Building this tool requires the gcc compiler and FreeType library. Most Linux distributions include both by default. For others, you may need to install developer tools and download and build FreeType from the source. Then edit the Makefile to match your setup before invoking “make”.
fontconvert expects at least two arguments: a font filename (such as a scalable TrueType vector font) and a size, in points (72 points = 1 inch; the code presumes a screen resolution similar to the Adafruit 2.8" TFT displays). The output should be redirected to a .h file…you can call this whatever you like but I try to be somewhat descriptive:
- ./fontconvert myfont.ttf 12> myfont12pt7b.h
The GNU FreeFont files are not included in the library repository but are easily downloaded. Or you can convert most any font you like.
The name assigned to the font structure within this file is based on the input filename and font size, not the output. This is why I recommend using descriptive filenames incorporating the font base name, size, and "7p". Then the .h filename and font structure name can match.
The resulting .h file can be copied to the Adafruit_GFX/Fonts folder, or you can import the file as a new tab in your Arduino sketch using the Sketch→Add File… command.
If in the Fonts folder, use this syntax when #including the file:
- #include<Fonts/myfont12pt7b.h>
If a tab within your sketch, use this syntax:
- #include"myfont12pt7b.h"